A Practical Brake Upgrade Guide: Step-by-Step to Better Stopping
Upgrading your brakes isn't about buying the most expensive parts, but choosing the plan that best matches how you drive. This guide will take you from beginner to informed, helping you avoid costly mistakes.
The Brake Upgrade Pyramid: Foundational to Ultimate
Think of brake upgrades like building a pyramid. Without a solid base, the fancy top layers are useless. Follow this priority order for effective, safe upgrades.
1. High-Value Core Upgrade (For 90% of Drivers)
What to Do: Install High-Performance Brake Pads + flush with DOT 5.1 or higher brake fluid.
Approximate Cost: ~$110 - $280 USD (Parts + Labor).
Result: Noticeably firmer pedal feel; drastically reduced "brake fade" (that mushy feeling when brakes get hot).
Key Choices:
Pads: Choose "Street/Sport" compound pads (e.g., Ferodo DS2500, EBC Greenstuff). They balance stopping power, low noise, and low dust. Avoid true "race" pads—they need high heat to work and perform poorly when cold.
Pitfall to Avoid: The system must be fully bled of air when changing fluid. Air in the lines causes a spongy pedal.
2. Balanced Performance Upgrade (For Spirited & Mountain Driving)
What to Do: Add High-Quality Slotted Rotors (and optionally, Steel Braided Brake Lines) to Step 1.
Approximate Cost: ~$420 - $850 USD.
Result: Major improvement in heat dissipation for confidence on long downhills; braided lines give a more direct, "expansion-free" pedal feel.
Key Choices:
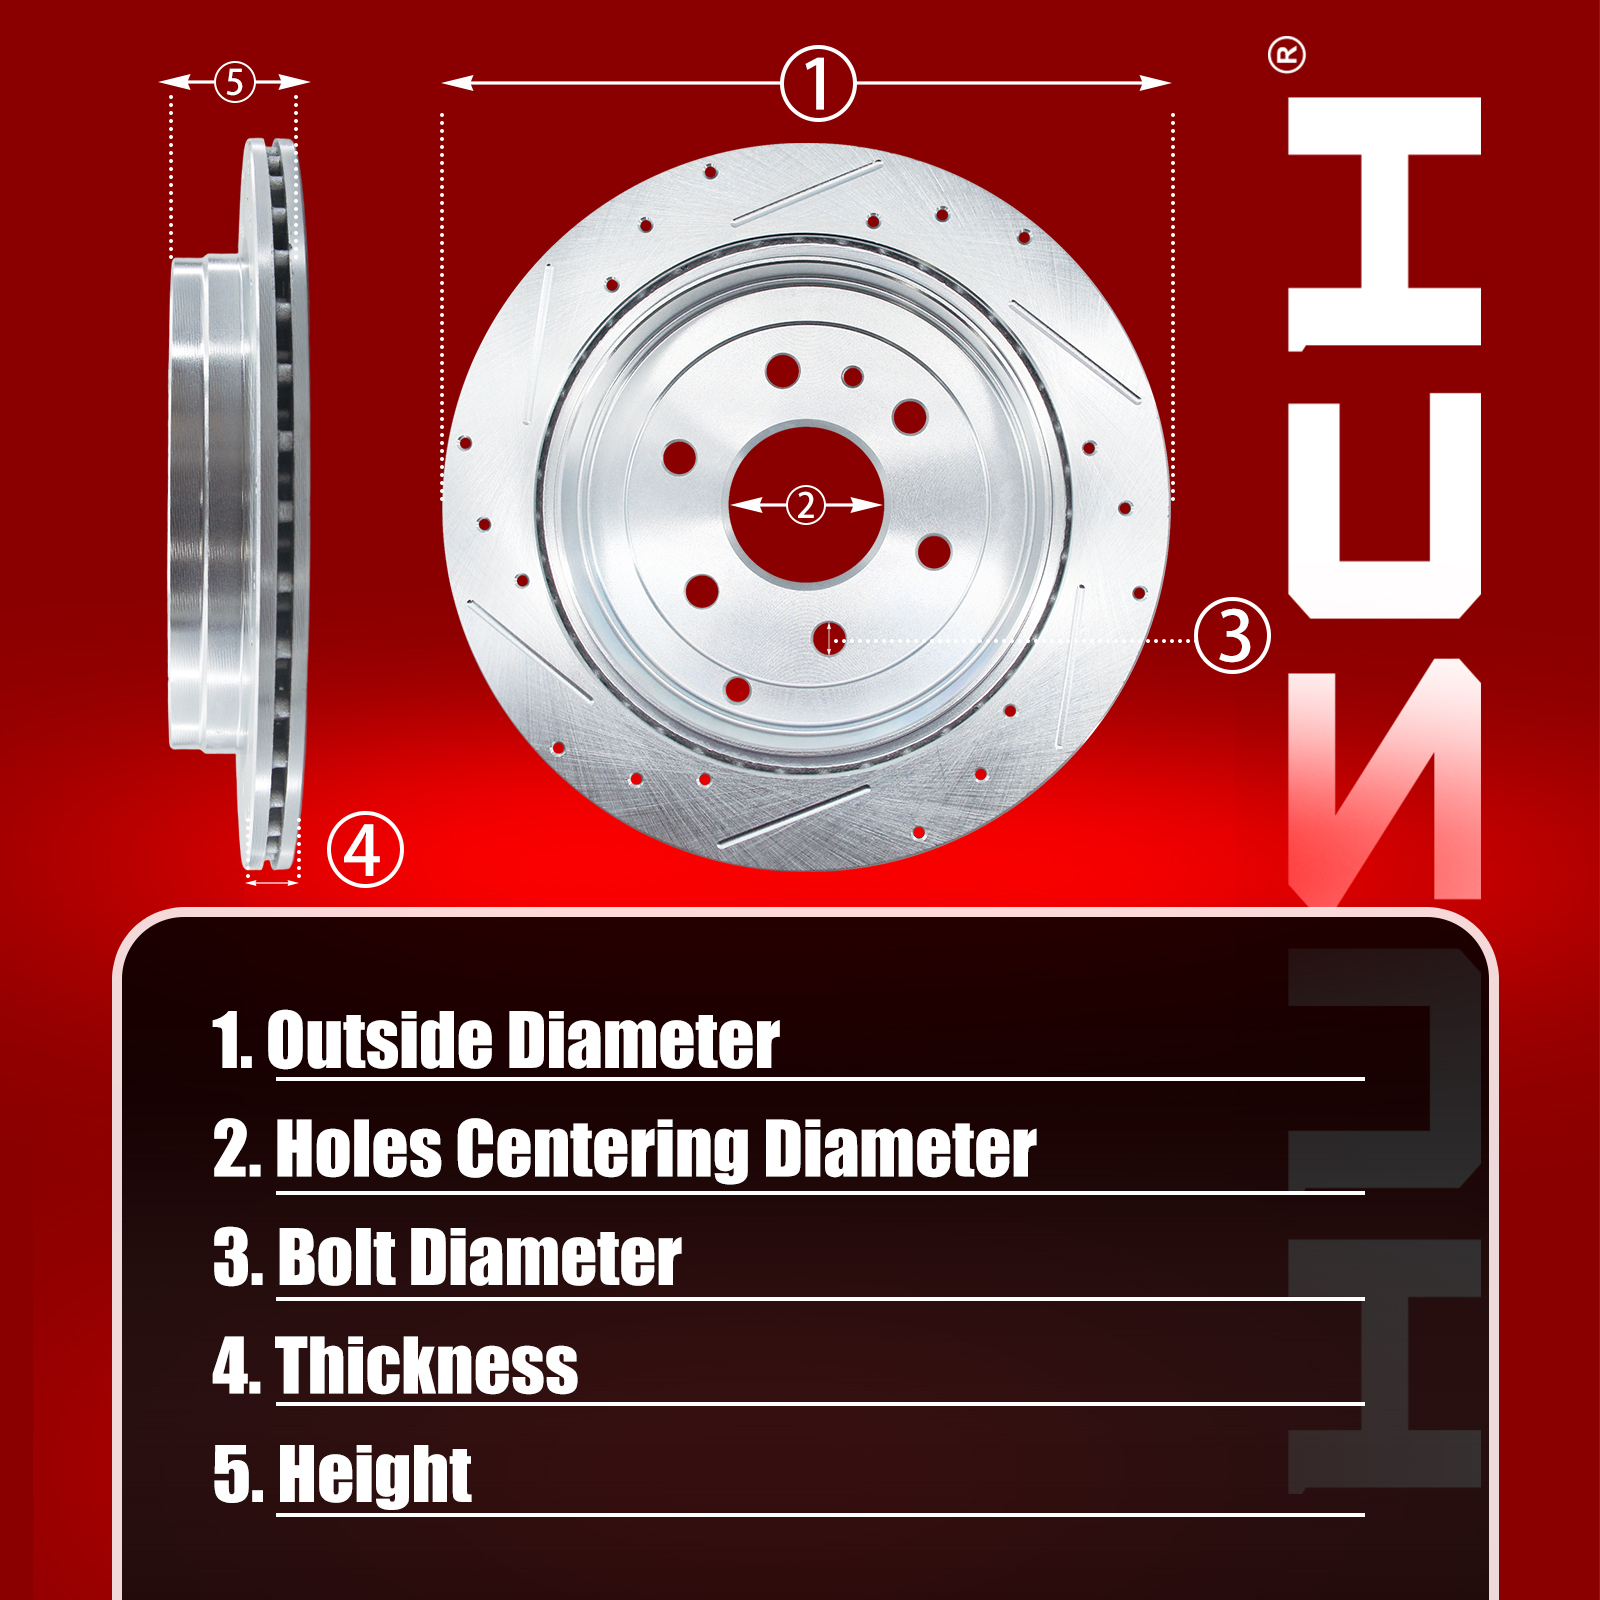
Rotors: Slotted rotors are the best all-around choice for the street. Be cautious with drilled rotors—they can increase noise and crack more easily.
Pitfall to Avoid: Before buying, confirm the new rotors match your car's hub bore diameter, bolt pattern, and thickness, or buy a vehicle-specific kit.
3. Ultimate Look & Performance (For High-HP Cars or Track Enthusiasts)
What to Do: Install a Big Brake Kit (BBK) with multi-piston calipers (includes calipers, brackets, larger rotors).
Approximate Cost: Domestic Brands: ~$700 - $1,700 USD. Int'l Brands (AP, Brembo): ~$2,100+ USD.
Result: Maximum stopping power, best fade resistance, and a visually impressive wheel setup.
The Biggest Hurdle – Wheel Fitment:
This is critical! You must verify that your wheels have enough inner barrel clearance and correct offset (ET) to clear the massive new calipers. The safest method is to provide your wheel specs to the seller or look for confirmed fitment photos.
Pitfalls to Avoid:
Never upgrade just the front brakes! You must also improve the rear brakes (at minimum, with performance pads/rotors) to maintain safe brake balance and prevent instability.
Beware of fakes/used parts: Always buy from authorized dealers. Safety is paramount.
3 Crucial Real-World Questions Answered
1. "I upgraded my brakes. Why does it feel like I take longer to stop?"
The Truth: Your brakes stop the wheels, but your tires provide the friction that stops the car. Factory brakes are strong enough to activate ABS (lock the wheels). If your tires have poor grip, better brakes will just trigger ABS sooner and more often, not shorten your stopping distance.
The Fix: Before any brake upgrade, inspect and consider upgrading your tires.
2. "Do new brakes need a 'break-in'? How?"
Absolutely Yes! New pads and rotors need to transfer a thin layer of material to each other to work optimally. Hard driving without bedding them in can cause "glazing" (a hard, shiny surface), which ruins braking performance.
Simple Bedding Procedure: On a safe, empty road, from about 40 mph, make 8-10 medium-strength stops (decelerating to about 15 mph—enough to feel strong deceleration but not slam you forward). Drive for 30-60 seconds between stops to let the brakes cool. Avoid hard stops for the next few hundred miles.
3. "Where should I get this done, and what's the cost breakdown?"
Dealership: Rarely does custom work; only installs OEM parts.
Specialty Performance Shop: The best choice. They have experience, vehicle-specific data, and can provide expert advice and installation.
Major Automotive Service Chains: Good for basic pad/rotor upgrades (Step 1 & 2) and offer value, but may have limited experience with big brake kits (Step 3).
Cost Formula: Total Price = Parts Cost + Labor. Labor typically adds 20%-30% to the parts cost and includes removal, installation, bleeding, and break-in guidance. Always ask if a quote is "all-in."
Final Recommendation:
Your goal dictates your budget. Ask yourself: What's my driving complaint?
If factory brakes just feel "mushy," Step 1 is often enough.
If you enjoy mountain drives and experience fade, Step 2 is for you.
If you have significantly more engine power, or want the ultimate look and track-day capability, consider Step 3—but only after confirming wheel fitment and budget.
Remember, safety is the number one rule. A logical upgrade path with matched components and professional installation is far more important than blindly chasing "big brake kits." Spend your money wisely for real-world safety and confidence.